Mostrando las entradas con la etiqueta programacion. Mostrar todas las entradas

domingo, 20 de octubre de 2013

AJAX FACEBOOK CONNECT WITH JQUERY & PHP II

Process Requests

The process_facebook.php file connects to Facebook and compares user information in database table, if connected user information is not available, it registers user using their Facebook data, storing information in the database. In case user information is already available in database, script responses with a welcome back message & logging him in the your website.
process_facebook.php sets PHP session variables to log-in users. You might want to replace the function with your own in-built authentication system to create users or log-in them into your website.
1
2
3
4
5
6
7
8
9
10
11
12
13
14
15
16
17
18
19
20
21
22
23
24
25
26
27
28
29
30
31
32
33
34
35
36
37
38
39
40
41
42
43
44
45
46
47
48
49
50
51
52
53
54
55
56
57
58
59
60
61
62
63
64
65
66
67
68
69
70
71
72
73
74
75
76
77
78
79
80
81
82
83
84
85
86
87
88
89
90
91
92
93
94
95
<?php
session_start();

/*
check our post variable from index.php, just to insure user isn't accessing this page directly.
You can replace this with strong function, something like HTTP_REFERER etc.
*/

if(isset($_POST["connect"]) && $_POST["connect"]==1)
{
    include_once("config.php"); //Include configuration file.

    //Call Facebook API
    if (!class_exists('FacebookApiException')) {
    require_once('inc/facebook.php' );
    }
        $facebook = new Facebook(array(
        'appId' => $appId,
        'secret' => $appSecret,
    ));

    $fbuser = $facebook->getUser();
    if ($fbuser) {
        try {
            // Proceed knowing you have a logged in user who's authenticated.
            $me = $facebook->api('/me'); //user
            $uid = $facebook->getUser();
        }
        catch (FacebookApiException $e)
        {
            //echo error_log($e);
            $fbuser = null;
        }
    }

    // redirect user to facebook login page if empty data or fresh login requires
    if (!$fbuser){
        $loginUrl = $facebook->getLoginUrl(array('redirect_uri'=>$return_url, false));
        header('Location: '.$loginUrl);
    }

    //user details
    $fullname = $me['first_name'].' '.$me['last_name'];
    $email = $me['email'];

    /* connect to mysql */
    $connecDB = mysql_connect($hostname, $db_username, $db_password)or die("Unable to connect to MySQL");
    mysql_select_db($db_name,$connecDB);

    //Check user id in our database
    $result = mysql_query("SELECT COUNT(id) FROM usertable WHERE fbid=$uid");
    $UserCount = mysql_fetch_array($result);

    if($UserCount[0])
    {
        //User exist, Show welcome back message
        echo 'Ajax Response :<br /><strong>Welcome back '. $me['first_name'] . ' '. $me['last_name'].'!</strong> ( Facebook ID : '.$uid.') [<a href="'.$return_url.'?logout=1">Log Out</a>]';

        //print user facebook data
        echo '<pre>';
        print_r($me);
        echo '</pre>';

        //User is now connected, log him in
        login_user(true,$me['first_name'].' '.$me['last_name']);
    }
    else
    {
        //User is new, Show connected message and store info in our Database
        echo 'Ajax Response :<br />Hi '. $me['first_name'] . ' '. $me['last_name'].' ('.$uid.')! <br /> Now that you are logged in to Facebook using jQuery Ajax [<a href="'.$return_url.'?logout=1">Log Out</a>].
        <br />the information can be stored in database <br />'
;
        //print user facebook data
        echo '<pre>';
        print_r($me);
        echo '</pre>';
        // Insert user into Database.
        @mysql_query("INSERT INTO usertable (fbid, fullname, email) VALUES ($uid, '$fullname','$email')");

        //User is now connected, log him in
        login_user(true,$me['first_name'].' '.$me['last_name']);
    }

    mysql_close($connecDB);
}

function login_user($loggedin,$user_name)
{
    /*
    function stores some session variables to imitate user login.
    We will use these session variables to keep user logged in, until he/she clicks log-out link.
    If you are using some authentication library, login user with it instead.
    */

    $_SESSION['logged_in']=$loggedin;
    $_SESSION['user_name']=$user_name;
}
?>

With jQuery connecting to Facebook is super easy, I am sure this will help you make your own Ajax Facebook Connect, any good feedback would be hugely appreciated, Good luck.
Read More

Ajax Facebook Connect with jQuery & PHP I


If you are looking for an easy Ajax solution to connect to Facebook, this simple method could do the trick. In this tutorial you will see how we can connect users to Facebook and let them register on your site easily with their Facebook name and email. All these happens without even refreshing the page. I have used jQuery and Facebook PHP SDK files available at Github. But for your convenience, I have created a zipped sample file, downloadable at the bottom of the page, which already includes SDK and jQuery files
There are basically three PHP files in this tutorial, the purpose of these files is to connect to Facebook and import user details, in order to complete registration or login the existing users.
Configuration file (config.php) basically does nothing but stores settings information, which are needed by Facebook API and database queries, we just include this file wherever needed. Main Page (index.php) is the front page where visitors see Ajax Facebook Connect button.Processing (process_facebook.php) is the important file, because it retrieves, stores user details in database, logs-in user and responds with the result.
I am sure at this point, I am sure you must have created a Facebook application and wrote down its App ID and App Secret.
Run MySql query below in phpMyAdmin to create a table called “usertable“, table containing 4 fields. id(Int, Auto Increment), fbid(BigInt, Facebook ID), fullname(Varchar, Full Name) and email(Varchar, Email). Note that fbid is BIGINT to make sure all long facebook IDs fit in it.

CREATE TABLE IF NOT EXISTS `usertable` (
  `id` int(20) NOT NULL AUTO_INCREMENT,
  `fbid` bigint(20) NOT NULL,
  `fullname` varchar(60) NOT NULL,
  `email` varchar(60) NOT NULL,
  PRIMARY KEY (`id`)
) ENGINE=InnoDB  DEFAULT CHARSET=latin1 AUTO_INCREMENT=1;

Configuration File

Insert needed values in config.php file, replace xxxx with your Facebook App ID, App Secret and MySQL database information. Specify return URL and permissions required.

1
2
3
4
5
6
7
8
9
10
11
12
13
14
<?php
########## app ID and app SECRET (Replace with yours) #############$appId = 'xxxxxx'; //Facebook App ID
$appSecret = 'xxxxxxxxxxxxxx'; // Facebook App Secret
$return_url = 'http://yoursite.com/connect_script/';  //path to script folder
$fbPermissions = 'publish_stream,email'; //more permissions : https://developers.facebook.com/docs/authentication/permissions/

########## MySql details (Replace with yours) #############$db_username = "xxxxxx"; //Database Username
$db_password = "xxxxxx"; //Database Password
$hostname = "localhost"; //Mysql Hostname
$db_name = 'database_name'; //Database Name
###################################################################?>
Main Page
Main page (index.php) renders “Facebook Connect” button, and logs-in user using jQuery Ajax with click of the button. It uses session variables set in process_facebook.phpto login users, you just have to replace it with some built-in user authentication system, which will instantly check user and log him/her in.

1
2
3
4
5
6
7
8
9
10
11
12
13
14
15
16
17
18
19
20
21
22
23
24
25
26
27
28
29
30
31
32
33
34
35
36
37
38
39
40
41
42
43
44
45
46
47
48
49
50
51
52
53
54
55
56
57
58
59
60
61
62
63
64
65
66
67
68
69
70
71
72
73
74
75
76
77
78
79
80
81
82
83
84
85
86
87
88
89
90
91
92
93
94
95
96
97
98
99
<?php
session_start();
include_once("config.php");

if(isset($_GET["logout"]) && $_GET["logout"]==1)
{
//User clicked logout button, distroy all session variables.
session_destroy();
header('Location: '.$return_url);
}
?>
<!DOCTYPE html>
<html xmlns:fb="http://www.facebook.com/2008/fbml" xml:lang="en-gb" lang="en-gb" >
<head>
<!-- Call jQuery -->
<script src="http://ajax.googleapis.com/ajax/libs/jquery/1.7.2/jquery.min.js" type="text/javascript"></script>
<title>Ajax Facebook Connect With jQuery</title>
 <script>
 function AjaxResponse()
 {
     var myData = 'connect=1'; //For demo, we will pass a post variable, Check process_facebook.php
     jQuery.ajax({
     type: "POST",
     url: "process_facebook.php",
     dataType:"html",
     data:myData,
     success:function(response){
     $("#results").html('<fieldset style="padding:20px">'+response+'</fieldset>'); //Result
 },
     error:function (xhr, ajaxOptions, thrownError){
     $("#results").html('<fieldset style="padding:20px;color:red;">'+thrownError+'</fieldset>'); //Error
    }
 });
 }

function LodingAnimate() //Show loading Image
{
    $("#LoginButton").hide(); //hide login button once user authorize the application
    $("#results").html('<img src="ajax-loader.gif" /> Please Wait Connecting...'); //show loading image while we process user
}

function ResetAnimate() //Reset User button
{
    $("#LoginButton").show(); //Show login button
    $("#results").html(''); //reset element html
}

 </script>
</head>
<body>
<?php
if(!isset($_SESSION['logged_in']))
{
?>
    <div id="results">
    </div>
    <div id="LoginButton">
    <div class="fb-login-button" onlogin="javascript:CallAfterLogin();" size="medium" scope="<?php echo $fbPermissions; ?>">Connect With Facebook</div>
    </div>
<?php
}
else
{
    echo 'Hi '. $_SESSION['user_name'].'! You are Logged in to facebook, <a href="?logout=1">Log Out</a>.';
}
?>

<div id="fb-root"></div>
<script type="text/javascript">
window.fbAsyncInit = function() {
FB.init({appId: '<?php echo $appId; ?>',cookie: true,xfbml: true,channelUrl: '<?php echo $return_url; ?>channel.php',oauth: true});};
(function() {var e = document.createElement('script');
e.async = true;e.src = document.location.protocol +'//connect.facebook.net/en_US/all.js';
document.getElementById('fb-root').appendChild(e);}());

function CallAfterLogin(){
        FB.login(function(response) {
        if (response.status === "connected")
        {
            LodingAnimate(); //Animate login
            FB.api('/me', function(data) {
              if(data.email == null)
              {
                    //Facbeook user email is empty, you can check something like this.
                    alert("You must allow us to access your email id!");
                    ResetAnimate();

              }else{
                    AjaxResponse();
              }
          });
         }
    });
}

</script>

</body>
</html>

Read More

Reconocimiento de voz con javascript


Annyang es una pequeña librería en javascript que permite a los visitantes controlar los sitios web usando comandos de voz. La librería es muy ligera, pesa menos de 1K, no tiene dependencias y puede ser usada y modificada a libertad.
El plugin es compatible con browsers que soporten reconocimeto de voz como google chrome, es muy fácil de usar solo agregar la referencia al archivo y llamar una función.

  1. <script src="//cdnjs.cloudflare.com/ajax/libs/annyang/0.2.0/annyang.min.js"></script> <script> if (annyang) { // Let's define our first command. First the text we expect, and then the function it should call var commands = { 'show tps report': function() { $('#tpsreport').animate({bottom: '-100px'}); } }; // Initialize annyang with our commands annyang.init(commands); // Start listening. You can call this here, or attach this call to an event, button, etc. annyang.start(); } </script>

El arreglo de comandos es muy simple, colocas la frase y la función que se ejecutará cuando el usuario la pronuncie en el micrófono. Desde todo punto de vista algo para tener en cuenta.

¿Qué pasa con los comandos más complicadas?
annyang entiende comandos con variables con nombre , símbolos de , y palabras opcionales .
Utilice variables con nombre de uno los argumentos de palabras en su comando.
Use símbolos para capturar texto de varias palabras al final de su mandato (codicioso).
Use palabras o frases opcionales para definir una parte de la orden como opcional.

<script> var commands = { // annyang will capture anything after a splat (*) and pass it to the function. // e.g. saying "Show me Batman and Robin" is the same as calling showFlickr('Batman and Robin'); 'show me *term': showFlickr, // A named variable is a one word variable, that can fit anywhere in your command. // e.g. saying "calculate October stats" will call calculateStats('October'); 'calculate :month stats': calculateStats, // By defining a part of the following command as optional, annyang will respond to both: // "say hello to my little friend" as well as "say hello friend" 'say hello (to my little) friend': greeting }; var showFlickr = function(term) { var url = 'http://api.flickr.com/services/rest/?tags='+tag; $.getJSON(url); } var calculateStats = function(month) { $('#stats').text('Statistics for '+month); } var greeting = function() { $('#greeting').text('Hello!'); } </script>

Read More

sábado, 19 de octubre de 2013

Hay una gran cantidad de plugins jQuery New Ticker con gran cantidad de opciones que se pueden utilizar. ¿Quieres aprender a crear uno por su cuenta en tan solo 4 líneas de código jQuery od?
La idea es bastante simple, tome primer elemento de la lista, aplicar algún efecto desaparece en él y en la devolución de llamada adjuntarlo al final de la lista.
En primer lugar tenemos que crear HTML con la lista de nuestras noticias, algo como esto:

             <ul id="ticker">
  <li>
   jqBarGraph es plugin de jQuery que te da la libertad para visualizar fácilmente los datos en forma de gráficos. Hay tres tipos de gráficos: simple, múltiple y apilados.
  </ Li>
  <li>
   Aprenda a crear galería de imágenes en 4 líneas de Jquery
  </ Li>
  <li>
   jqFancyTransitions es fácil de usar plugin de jQuery para mostrar las fotos como presentación de diapositivas con efectos de transición de fantasía.
  </ Li>
  <li>
   mooBarGraph es AJAX complemento gráfico de MooTools que soportan dos tipos de gráficos, simples barras y gráfico de barras apiladas.
  </ Li>
 </ul>

hora, vamos a poner un poco de estilo al respecto. Vamos a establecer la altura del área de ticker visible y fijar a desbordamiento oculta. Si queremos sólo una noticia a ser visible en el momento en que la altura ticker debe ser la misma que la altura de cada elemento de la lista. Para noticias al mismo tiempo, más visible que sólo tenemos que multiplicar la altura de cada elemento con el número de noticias que queremos que sea visible y establecer que a medida que la altura del ticker.

# Ticker {
 altura: 40px;
 overflow: hidden;
}
# Ticker li {
 altura: 40px;
}

Por supuesto, usted puede y debe añadir más estilo de aquí, pero esto va a ser suficiente para hacer que su ticker funcione.
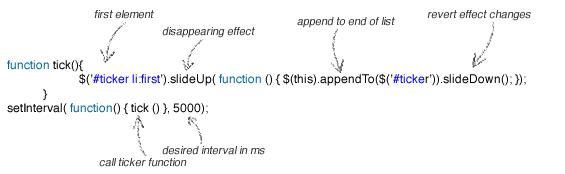
Ok, tenemos que configurar la presentación y ahora es el momento para hacer esta noticia para empezar marcando. En primer lugar vamos a crear la función que se aplicará efecto desaparece en el primer elemento, agregar ese elemento al final de la lista después de que desaparezca y revertir efectos de los cambios. Después de eso, todo lo que tenemos que hacer es llamar a esa función en los intervalos deseados.


Y aquí está el código claro:
tick function () {
 . $ ('# Ticker li: first') slideUp; (function () {$ (this) appendTo ($ ('# ticker')) slideDown ()..})
}
setInterval (function () {tick ()}, 5000);
Por supuesto, puede cambiar slideUp con cualquier otra animación que quieras, pero no te olvides de volver efectos sobre elementos después de la transición. Siguiente ejemplo creará opacidad a 0 para el primer elemento.
tick function () {
 $ ('# Ticker li: first') animación ({'opacidad': 0}., 200, function () {$ (this) appendTo ($ ('# ticker')) css ('opacidad', 1.. );});
}
setInterval (function () {tick ()}, 4000);
Y por favor no se olvide de incluir jQuery en la cabecera del documento
<script src="https://ajax.googleapis.com/ajax/libs/jquery/1.6.4/jquery.min.js"> </ script>
Eso es todo, barra de noticias se hace.
Read More

About Me

Popular Posts

Designed By Seo Blogger Templates